Only Perfect Practice Makes Perfect - Part Seven
- Nov 7, 2017
- 11 min read

SHOOTING STRAIGHT AT THE HIGH TOWER. (Part 1.)
Please do not take the title of this editions article too literally and shoot straight at the high tower, doing this tends to upset the ground owner as you are likely to scratch the paintwork on his traps!
What I mean by “Shooting Straight at the High Tower” is developing a technique that will enable you to consistently hit high flying targets whether they are either inanimate Clays or live soaring Pheasants.
In the previous article we looked at the lowest target on a sporting course, “The Bolting Rabbit” now we are at the opposite end of the scale and will look at how to tackle shooting the “High Bird”, which has always been considered the ultimate test of the Sporting Shots skills.
The majority of commercial shooting grounds in the UK, Europe & America now have at least one High Tower on their grounds, which literally is the high point of their Sporting Clays course, so whether you shoot just for fun or are a serious Competition shot you will inevitably encounter the High Crosser or Driven Bird, at altitudes of up to 140 feet (42/43 meters).

Tower at West London Shooting School 1901.
In fact, the driven tower bird was the original sporting clays target.
The shooting schools that sprang up everywhere in England in the late 19th century built their towers to simulate the driven pheasant and partridge game birds their wealthy and aristocratic clients would shoot in the field. If you ever visit the famous West London Shooting School, the oldest still operating, you will see the original towers still in use.
Hitting the High Bird is the ultimate challenge and test of ability that both the Wing(Game) and Clay Shooter share, bringing down that Soaring Pheasant on a lofty Drive or “Dusting” that 90mm Midi clay as it streaks away from the tower, is the testimony of our personal skill and perfect technique.
High targets can strike fear into the hearts of even the bravest and most experienced of shooters, the problem we all suffer from, is the mental “intimidation” we create by the way we exaggerate the height of the shot, by generally talking in “Imperial Feet” as opposed to Imperial Yards or Metric Meters, shooting a 120 Ft tower target sounds a lot more difficult than shooting a 40yd/37mt crossing one, which most of us have encountered and would not find too testing to hit.
So by starting with that thought in mind, you have already taken some of the fear and doubt away from shooting the High tower, especially when you also realize these targets will normally show a lot more of the “Underside” (belly) of the clay, giving you a bigger and better object to focus on and make contact with up in the sky. Already, hitting these once daunting targets is starting to sound “Easier”.

This is the one particular target where the “Gun Down” shooter has a distinct advantage over those that prefer to shoot “Gun Up” (Pre-Mounted) as shooting the high bird is the most demanding of all the physical movements we have to make. Once the Gun is locked into our shoulder pocket, it will dramatically restrict our physical ability to move freely and continue to point naturally. It is vitally important to realise that the moment the butt of the stock makes contact with the shoulder and the longer it’s there before the trigger is pulled, it means our control of the Gun becomes increasingly poor and the ability to maintain barrel contact with the line of the target, the Height!, reduces rapidly, resulting in the barrels being pulled down as the shoulders are invariably “Rainbowed”
To overcome this effect the “Gun Up” shooter must make a positive effort to keep the front hand, the motive force, lifting the Gun up, making what feels like an over exaggerated vertical pointing movement, which in turn keeps the shoulders up and square, moving parallel to the flight line of the target.
If you shoot in international competition you will certainly need to be able to cope with the Tower Stand, for the high driven or crossing target is a favorite of European & American course designers. Towers are not just used for classic high incomers however, crossing targets thrown from a high elevation simulate testing passing shots at wild fowl or doves and then there can be the overhead going away (or retreating) target that presents it’s own specific problems that need to be overcome in order to score consistently.
How then, do we prepare to take on this most demanding of targets, well the first thing the majority of shooters immediately focus on is “How much Lead am I going to give it?”, which as we have discussed in earlier articles, that really is the “last thing to think about”. In my experience and opinion, as much as up to 95% of missed tower targets are lost because the shooter has incorrectly read the line and the direction the target is actually travelling in, especially as the clay will be moving faster over the first third of its flight and is probably still gaining height.
Variations in the line will have to be taken into account – not every target leaves the tower on a straight, flat trajectory, more often than not, the target will be angled slightly off to one side or if shooting a pair, either simultaneous or on report, the first and second birds could be launched at different speeds, different heights and even different locations!

Accurate assessment of target behavior is critical to success!
This then means that accurate observation of the targets behavior prior to shooting it is the key to breaking it;
Firstly, you must make sure you know where the target clearly appears in your window of opportunity, the “Visual Pick up Point”
Secondly, which direction is the clay flying in relative to the “Stand/Cage”?
Thirdly, what is the height, is the target still climbing, is it on a flat trajectory or even on a downward flight path?
Once you have assessed all this information, next is to decide on your set up;
How far out on the flight line do I start with the barrels?
How high do the muzzles need to be relative to the height of the target?
Where should I have my body line and place my feet relative to where I want to break the clay/s?
And all of this, even before we think about what distance in front we need to shoot.
Every shot we make starts from the feet upwards, as the way we stand dictates how far we can move or rotate our upper body, therefore, as previously covered in articles 1 & 2, the leading foot needs to be pointing at or just in advance of the place we intend to break the target, as this gives a 90° arc of movement to approach and make contact with the bird and then allows the correct amount of follow through or “Swing On” once the trigger has been squeezed.


For example, the direct overhead shot requires the classic 12 & 2 o’clock foot position for a Right hander and the 12 & 10 o’clock for the Left hander. This allows a free swing onto the correct line, with eyes, hands and shoulders all working in the same plane.
With our feet and body line now correctly set the next thing is to get the muzzle elevation and start point right, this means the barrels should be able to climb up from underneath the target whilst at the same time be moving on a diagonal approach so that they converge on to the flight line of the target to make accurate contact with it, allowing the muzzles to naturally move ahead maintaining the right direction and height, I.E “Keeping Up & On The Line!!!”.
This is a sequence from the Roger Silcox video “Shooting Straight at Competition” which shows Roger shooting a pair of targets from the 90 foot platform of the famous “Roundwood Tower”. You will see how the muzzles are set at an elevation relative to the targets height and that the gun remains out of the shoulder until contact is made with the clay and is there only long enough for the trigger to be squeezed as the follow on movement generates natural forward allowance!


It is vital to realise that the Greater the Height and Distance the target is away, the Greater (or “Bigger”) is the corresponding movement you will have to make in order to push the barrels ahead once contact is made! For the “Gun Down”shooter this means really stretching those arms out and away from the body giving the front hand, which is the motive force in lifting and pointing your Gun, the necessary power to reach up to and keep on the Line.
For the “Gun Up” shooter the main problem is that the front hand is totally governed by the Body’s movement, which now controls the movement of the muzzles, this is why the correct foot placement and position in the “Stand” becomes so very important. A critical factor is not to “Ride” or “Track” the target too long before pulling away to apply the “Lead”, once contact has been made you must “Push On” and as previously said, whilst keeping the shoulders parrallel to the flight line.

The correct “Pick Up Point” is vital to avoid the target getting the jump on you, forcing you to play “catch up” from behind, which generates too much uncontrolled forward momentum.
Unnecessarily chasing a clay across ten or twenty feet of empty sky throws control out of the window and makes reading any subtle variations of the line much harder, also the chances are that you will run out of swing before the shot is complete, leading to a miss behind.
There is another element that will affect our success at shooting the “High Bird” and that is where we place our front hand on the Guns fore end, because if it is placed too far forward this creates the effect of lengthening the stock, which in turn crucially effects our ability in keeping the muzzles up on the line of the target.

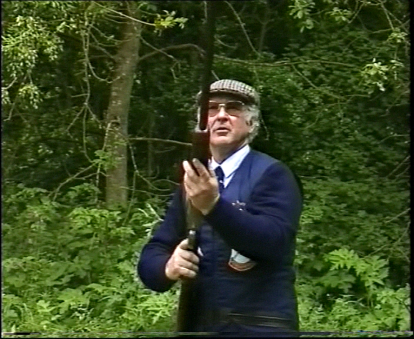
In this photo (right) - we see the that the “Stock is too Long and front hand too far forward”, if you look closely you will see this shooters eye is sitting below the rib, he will invariably lift his head at the last second to see the target, moving his cheek and eye away from the gun .
That means his barrels will not be pointing where his eye is looking and he will miss behind. Also his hand is too far forward, so this is making his stock even longer and as he is shooting a high driven target, he will pull the gun off line and also miss the target to the left.
The following shows how the correct front hand placement allows the gun to be placed in the face and moved to the maximum vertical position without being pulled off line.


As well as having our front hand in the right place we should also consider the position of our front hand Elbow as this is the power source with which we lift the gun, so it should be set at an angle below the hand, so that it supports the weight of the barrels and takes the strain and tension out from the Bicep and Fore Arm muscles allowing them to move freely. With the Elbow set too high it hinders our ability to lift the gun beyond shoulder height, and before you start to mention “Trap Shooters”, remember they do not have to shoot at targets that are more than 3.5 meters in height, so they can afford to have the Elbow set higher.


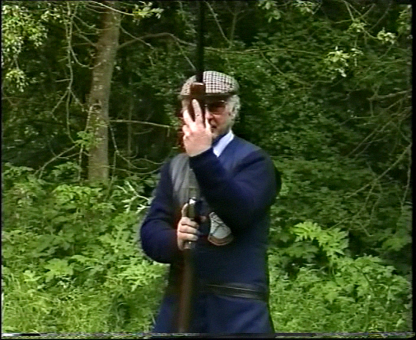
Images (above) - Correct front hand placement with the Elbow set below the front hand fully supporting the weight of the barrels and providing the power to lift the Gun.
In the next sequence of photos we see Roger shooting a straight Driven Clay but this time thrown from the 120’ foot platform of the Roundwood Tower, you will see how the Gun is brought to the vertical with minimum effort, his movement begins as soon as his eye locks onto the target and the mount moves at the same speed as the clay is traveling, with the gun coming into his face and the stock locking into the shoulder at the moment the barrels make contact with the clay, leaving only the forward allowance to be generated.
Look closely at the picture of the superimposed barrel and you will see the muzzles ahead of the target as it breaks.


1. Ready Position 2. Visual Pick Up, Mount begins. 3. Contact as Gun Comes into the Face 4. Trigger Squeezed as barrels pull ahead
You will also see that for shooting this higher target Roger has his front foot heel raised off the ground, this is classic Robert Churchill method, as by doing this it allows him to extend the physical movement and arc of the swing beyond the vertical, gaining valuable extra room on targets that can need a considerable amount of perceived lead or can be combined with a very high muzzle start point which is needed when faced with targets thrown in or across a small window of shooting opportunity


The one question I’m asked more than any other about shooting high flying targets by both Clay and Wing Shooters is when to start the mount, in my opinion you should start the movement the moment your eye locks on to the target, as I have said before “You Must Participate, Not Spectate”, if you delay the start of your movement you will be out of “Sync” with the speed of the target and your ability to accurately point at it and eventually make eye, muzzle contact with it will be poor. Also leaving the mount late and rushing the movement will make lifting the Gun up to the height of the target even more physically demanding on your Arms than a gradually accelerating, climbing approach up onto the line.
Like all the shots we make, timing is important, if you mount on the bird too soon you can end up with no swing at all or if you mount too late you can run out of “window’ and you turn the shot into a desperate uncontrolled slashing movement.
Timing is something that only comes with practice, the gun mount as always is crucial; remember it’s not a single action it’s a sequence with the shot only being taken when that sequence is completed: when the comb comes firmly into the cheek and under the eye and the butt is locked into the shoulder pocket.
No doubt you are all sitting reading this article anxiously waiting for me to start advising on what lead these Tower Targets should be given at all the various heights from 30ft to 140ft, well let me refer you to the following quote from the great Robert Churchill’s book on “Game Shooting” which he wrote in 1955
“IN PRACTICE THE SHOOTER SHOULD NOT BE CONSCIOUS OF HIS MUZZLE, THE RIB OR SIGHT. HIS EYE, OR RATHER HIS ATTENTION, SHOULD BE FULLY OCCUPIED WITH THE BIRD, AND, IF HE HOLDS HIS GUN PROPERLY, HE WILL HIT WHATEVER HE IS LOOKING AT.”
“DISMISS ALL IDEAS OF CALCULATED ALLOWANCES.”

“ALL SYSTEMS FOUNDED ON ALLOWANCES ARE INHERENTLY UNSTABLE AND UNSCIENTIFIC. INDEED, IT IS ONLY IN THE SPORT OF SHOOTING THAT THE MATTER EVEN ARISES. I HAVE NEVER HEARD THE QUESTION RAISED IN ANY OTHER FORM OF GAME WHERE THE HITTING OF A MOVING OBJECT, SUCH AS A BALL, IS INVOLVED.”
“IT IS HIGH TIME THAT THE WHOLE ALLOWANCE SYSTEM WAS DEPOSITED IN THE WASTE PAPER BASKET. IT IS NOT PRACTICAL AND IT ESTABLISHES AN ENTIRELY FALSE FOUNDATION OF THOUGHT AT THE BACK OF THE SHOOTERS MIND.”
“YOUR JOB IS TO KEEP YOUR EYE ON THE BIRD; FORGET ALL YOU EVER KNEW ABOUT THE THOUSANDS OF DIFFERENT ALLOWANCES AND THE THOUSANDS OF VARIETIES OF SHOTS AND LET YOUR EYE AND THE NATURAL OVER THROW OF HE GUN TAKE CARE OF EVERYTHING ELSE.”
“IN MY METHOD THERE IS NO QUESTION OF TRYING TO COMPUTE MUZZLE MOVEMENT, ALLOWANCE, OR ANY OTHER COMPLICATED MATTER. ALL I ASK YOU TO DO IS TO LOOK AT THE BIRD AND, BY CORRECT MOUNTING AND BODY WORK, SHOOT NATURALLY WITHOUT CONSTRAINT OR EFFORT APPARENTLY [SEEMINGLY] STRAIGHT AT THE BIRD; BUT SUBCONSCIOUSLY, OVERTHROWING A LITTLE AND SO GIVING THE NECESSARY LEAD OR COMPENSATION FOR TIME FLIGHT”
“WHEN I SAY ‘LOOK AT THE BIRD,’ I MEAN IT. YOU MUST GLUE YOUR EYES TO IT, FOCUS ON IT AND SEE NOTHING ELSE.”
In my opinion these are very wise words indeed, there is no instant solution to consistently hitting these tower targets and high birds; there is no magical amount of lead that can be applied that will always guarantee success, what is required is a solid practiced technique, experience and the ability to make quick accurate and often instinctive assessments of the targets behavior that allow us to create a positive response with the barrels of our Gun and place a veritable cloud of pellets on its flight path for it to fly into!
I sincerely hope my coaching methods, advice and the accompanying photographs in this series of articles will give you something to consider, practice and most importantly bring you the enjoyment of shooting with confidence and style that produces that “Perfect Shot” every time.
Remember, Good Shooting & Safe Shooting Are No Accident!
Best wishes... Keith..
i feel this so much; a lot of postings seem to be “evergreen” while they collect resumes and never close the loop. i’ve had interviews where they sounded excited, then nothing for weeks, and the recruiter wouldn’t even confirm if the role still existed. also that reply dropping a betting app is exactly the kind of noise that makes job threads feel worse; i’ve seen people derail serious posts with junk links, even weird ones such as https://bookabet.co.bw/betting/sites/dota2/ when someone is just asking for hiring clarity. i hope you land something soon, and i wish companies would at least send clear rejections instead of ghosting.
This part emphasizes deliberate, mindful training—a technique I’ve used when practicing aim in FPS games. It truly reinforces how repetition and analysis lead to muscle memory. If you appreciate alongside cosmetic progression, https://daddyskins.com/upgrade shows how organized case opening style and skin collection mirror skill development. In CS2, building your cosmetic stash can feel like leveling your talent—methodical practice meets aesthetic reward.